
A5 Pro Smart Lock Manual
Complete guide to the Tenon A5 Pro lock: opening by facial recognition, fingerprint, palm vein, password, IC card and mechanical key, Type-C emergency power, administrator setup, WiFi/Tuya Smart pairing, and all manufacturer technical specifications.
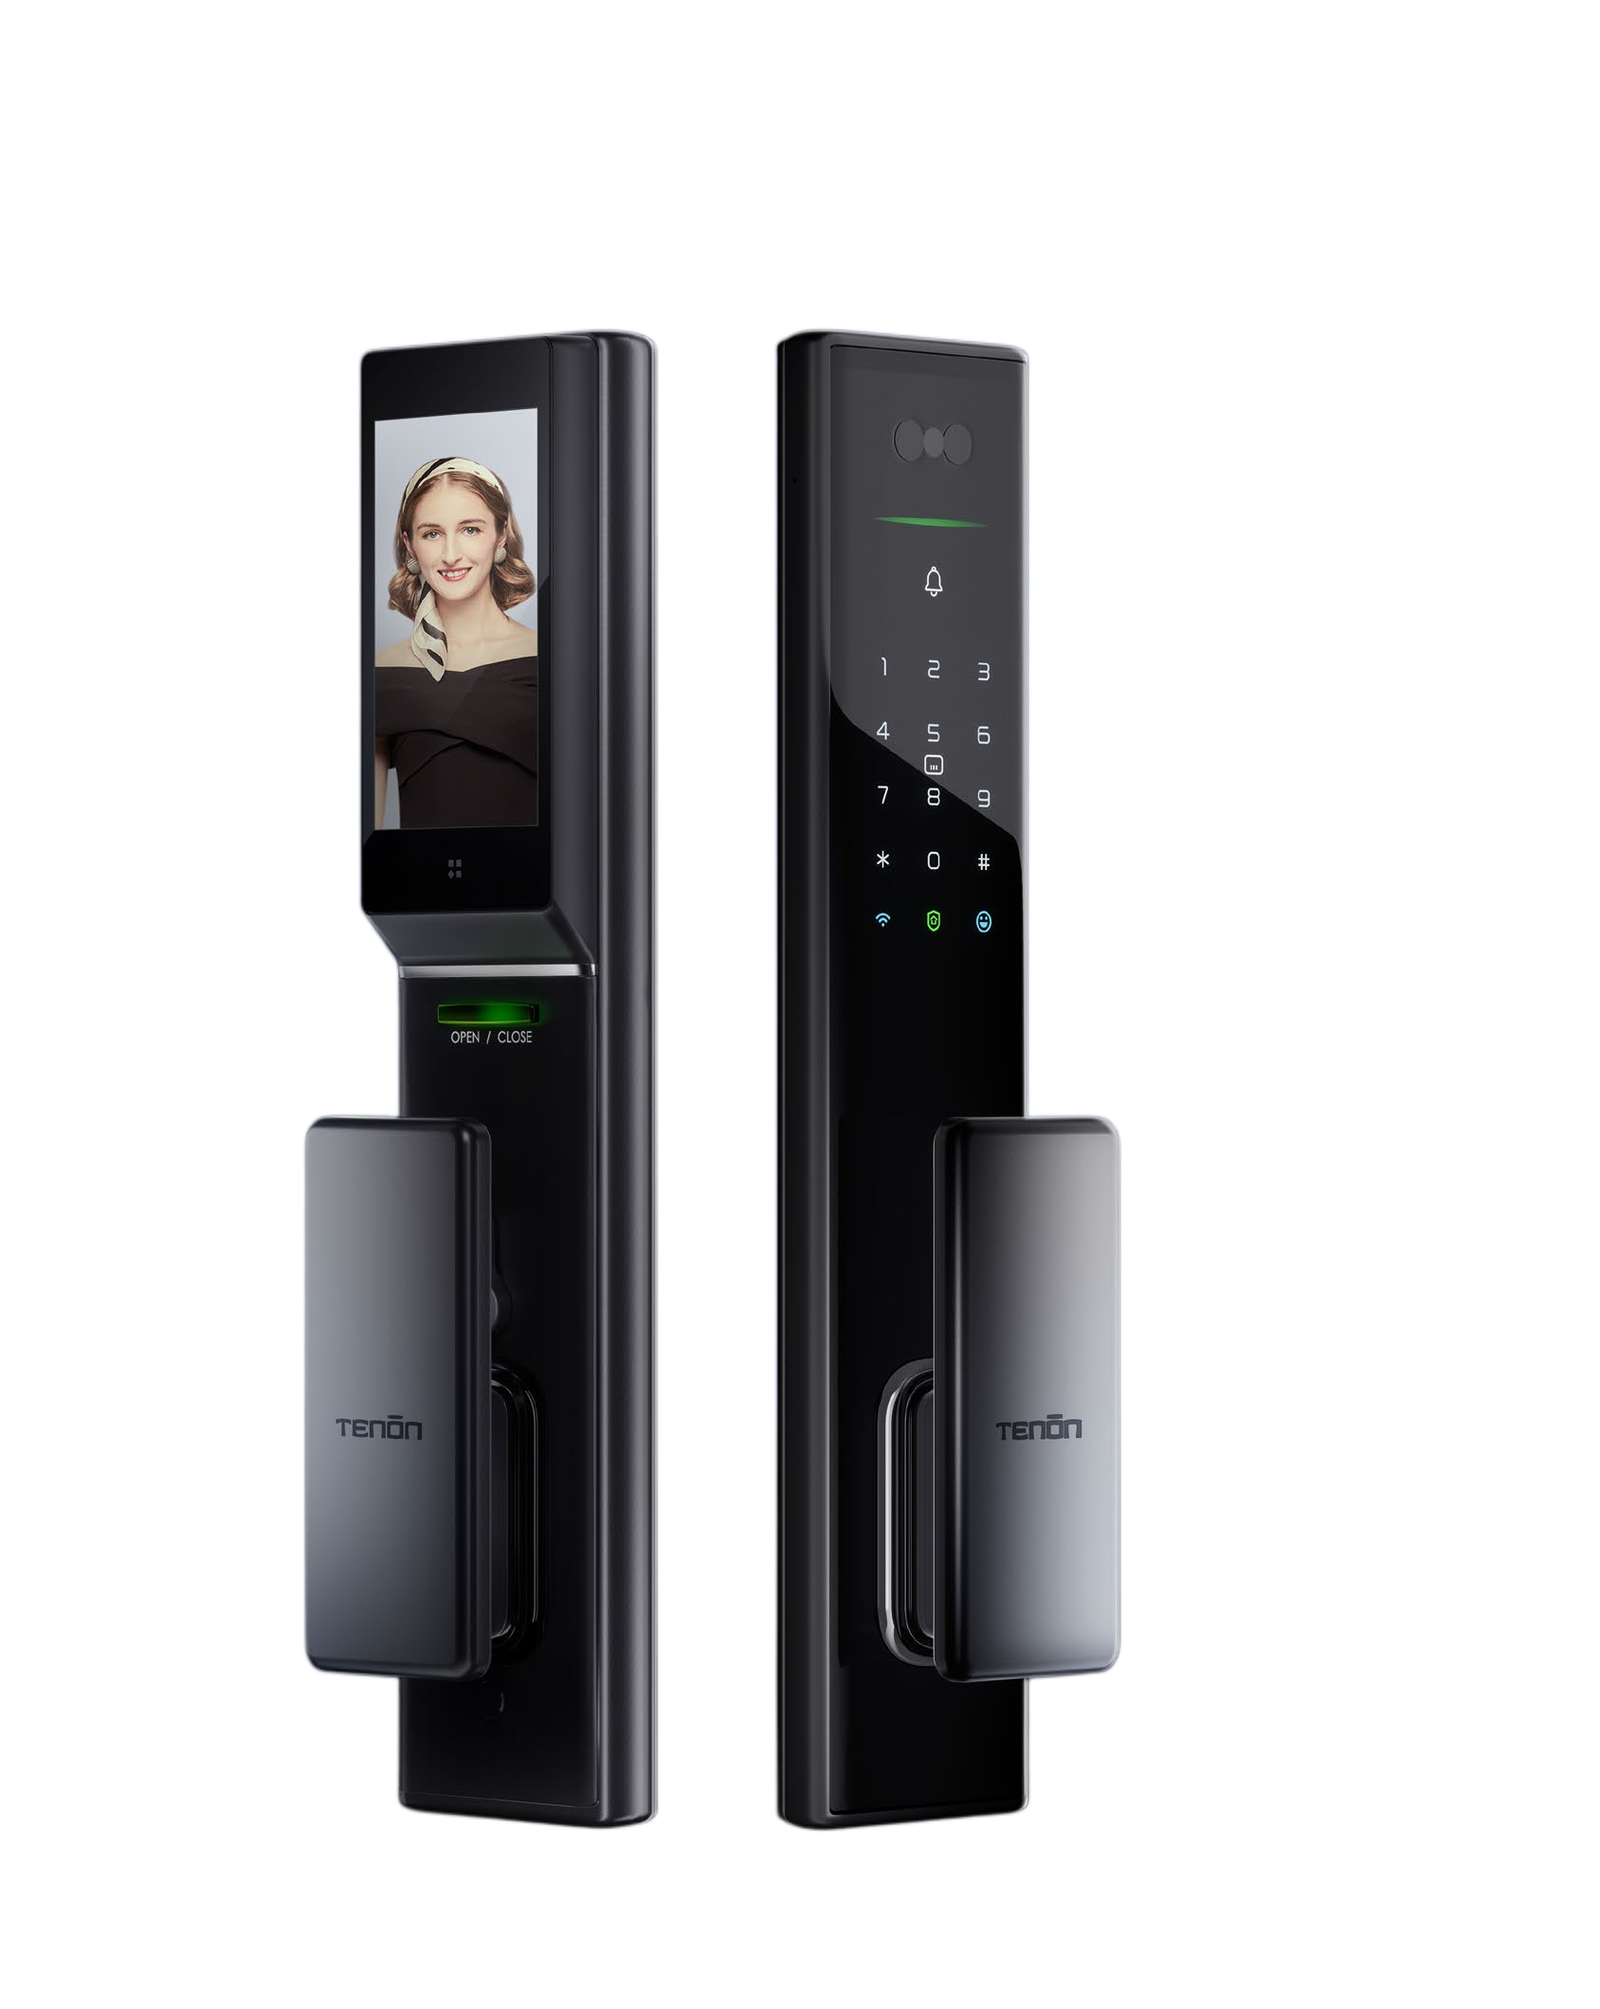
Manual prepared by Service Home Tech for the handover, configuration and support of the Tenon A5 Pro smart lock: administrator registration, users (fingerprint, face, palm vein, password and card), pairing with Tuya Smart, system settings, and security features. If you need help with installation or programming, message us on WhatsApp +507 6698-5872.
Main features
Visual summary of the functions declared by the manufacturer for the A5 Pro model and the operations included in the manual supplied.
Fingerprint
Semiconductor-type fingerprint module.
Password
Supports a virtual password for extra privacy.
IC card
Card type: Mifare M1.
Facial recognition
Included among the A5 Pro’s opening methods.
Palm vein
Combined capacity with facial recognition: 50 records.
Mechanical key
Backup method for manual opening.
App
App control, per the manufacturer’s spec sheet.
Emergency power
5V Type-C port for temporary opening.
Connectivity
A5 Pro spec sheet lists WiFi, compatible with Tuya Smart.
Voice prompts
Low battery alarm
Virtual password
System protection
Multi-level administrator settings
Technical specifications
Data organized for handover to the end customer, without altering the manufacturer’s technical values.
Device data
| Model | A5 Pro Fully Automatic Mortise |
| Material | Aluminium alloy |
| Mortise | T6068F / T7068F |
| Connectivity | WiFi |
| Screen | 4 inches |
| Listed dimensions | 80 / 396 / 20.8 / 37 / 12.5 / 188.2 / 63 / 66.3 / 79.8 / 396 mm |
Users, power and environment
| Fingerprint capacity | 99 units |
| Password capacity | 99 units |
| IC card capacity | 99 units |
| Face + palm vein | 50 units |
| Card type | Mifare M1 |
| Battery | 7.4V lithium |
| Emergency power | 5V Type-C |
| Low-voltage alarm | < 6.8V |
| Operating temperature | -25 °C to 70 °C |
| Relative humidity | 20 – 90% RH |
Spec sheet source: Tenon A5 Pro manufacturer catalog. Operation source: A5 manual supplied for this document.
Daily use of the lock
Basic steps from the manual’s operating process for opening, locking from the inside, and using backup functions.
Normal opening
-
Touch the screen. Wake the keypad or touch area of the lock.
-
Choose an opening method. Fingerprint, password or IC card, depending on the registered user.
-
Press the handle down. Green light: verification successful. Red light: verification failed.
Internal lock and double lock
-
Internal lock. Hold down the [OPEN/CLOSE] button inside the door to lock.
-
Unlock from outside. Press [#] and identify with fingerprint or password to open from outside.
-
Double lock. Hold [Double Lock] on the back panel for 5 seconds; the light changes from green to yellow and a voice prompt sounds.
Mechanical key
If the system fails or power is low, the mechanical key can be used. The manual indicates opening the cylinder cover and using the key for manual opening.
- Store the key outside the apartment or in a safe place.
- Don’t leave the mechanical key inside if you have no other way in.
Emergency power
When the battery runs out or the system stops, the manual indicates connecting a power bank to the Type-C port to open temporarily or restart the system.
- Use a 5V power bank on the Type-C port.
- After opening, charge or replace the battery as needed.
Initial setup
These steps prepare the lock to exit demo mode and register the first administrator.
1. Demo mode
-
Touch the screen. Wake the lock’s touch panel.
-
Try an unlocking method. Fingerprint / password / IC card.
2. Set up administrator
-
Touch the touch panel. Wake the screen.
-
Double-click [#]. Enter master mode.
-
Place the fingerprint 3 times. Slightly vary the finger’s position.
-
Enter a 6–8 digit password. Then press [#].
-
Re-enter the password. Confirm again, then press [#].
-
Tap an IC card or press [#]. Press [#] to skip this step if it doesn’t apply.
-
Success. The administrator is registered.
1. By default, the system assigns ID 01 to the administrator.
2. When adding the administrator for the first time, a password must be set. This step cannot be skipped. If skipped by mistake, press [*] to exit and try again.
User registration and management
Step-by-step format to register or delete users from the lock’s panel.
3. Register users
-
Touch the touch panel. Wake the lock.
-
Double-click [#]. Enter master mode.
-
Identify as administrator. Use administrator password or fingerprint.
-
Press [1]. Add user. Press [*] to exit.
-
Enter the user number. User ID to add: 02–99. Then press [#].
-
Place the fingerprint 6 times. Or press [#] to skip.
-
Enter a 6–8 digit password. Or press [#] to skip.
-
Re-enter the password. Press [#] to confirm.
-
Tap an IC card. Register the card if applicable.
-
Success. The user is registered.
4. Delete users
-
Touch the touch panel. Wake the lock.
-
Double-click [#]. Enter master mode.
-
Identify as administrator. Use administrator password or fingerprint.
-
Touch [2]. Enter the delete-users menu.
-
Enter the user ID. ID 02–99, then touch [#].
-
Choose what to delete. [1] fingerprint, [2] password, [3] IC card, [4] entire ID.
-
Success. The selected data is deleted.
Useful settings
Highlighted steps for WiFi/Tuya Smart network, system, date and volume.
5. WiFi setup
-
Touch the touch panel. Wake the screen.
-
Double-click [#]. Enter master mode.
-
Identify as administrator. Use password or fingerprint.
-
Touch [3]. Enter network settings.
-
Pairing mode. The lock is now ready to link.
-
Follow the app’s steps. Use the Tuya Smart app.
-
Success. The lock is added in the app.
6. System settings
-
Touch the touch panel. Wake the lock.
-
Double-click [#]. Enter master mode.
-
Identify as administrator. Use password or fingerprint.
-
Touch [4]. Enter system settings.
-
Available options. [1] serial number, [2] time and date, [3] software version, [4] volume, [6] doorbell, [7] language.
-
Success. Exit when done.
7. Date and time
-
Touch the touch panel. Wake the lock.
-
Double-click [#]. Enter master mode.
-
Identify as administrator. Use password or fingerprint.
-
Touch [6]. Enter date and time settings.
-
Enter DAY-MONTH-YEAR-HR-MIN. Or press [*] to exit.
-
Success. Date and time are set.
8. Volume
-
Touch the touch panel. Wake the lock.
-
Double-click [#]. Enter master mode.
-
Identify as administrator. Use password or fingerprint.
-
Press [3]. System settings.
-
Press [2]. Volume settings.
-
Press [1–4]. Select the volume level.
-
Success. Volume is adjusted.
Reset and system information
Quick steps to restore and check internal lock data.
9. Factory reset
-
Touch the touch panel. Wake the lock.
-
Double-click [#]. Enter master mode.
-
Identify as administrator. Use password or fingerprint.
-
Touch [4]. Enter factory reset.
-
Press [#] to confirm. Press [*] to exit.
-
Success. The lock confirms the operation.
10. View ID information
-
Touch the touch panel. Wake the lock.
-
Double-click [#]. Enter master mode.
-
Identify as administrator. Use password or fingerprint.
-
Touch [4]. System information, or [*] to exit.
-
Choose what to check. [1] lock ID, [2] time and date, [3] software version.
-
Success. The information is available to view.
Test / error mode
-
Enter master mode. Touch the screen, double-click [#] and identify as administrator.
-
Press [5]. Enter trial-and-error mode.
-
Touch [1] to turn on or [2] to turn off. Only use this function if applicable.
Alarms, protection and maintenance
How to read the lock’s lights, and which protection functions are active by default.
Light indicators
| Status | Indicator |
|---|---|
| Successful verification | Green light flashes twice. |
| Failed verification | Red light flashes twice. |
| Low battery | Red light flashes with a voice alert if not in silent mode. |
| System locked out | After entering the wrong password 5 times in 5 minutes, it goes to sleep for 90 seconds. |
| Locked from inside | Red light when waking the system; pressing [#] turns the light blue for identification. |
| Factory restore | Green light when system data is cleared. |
Protection functions
- Anti-peeping password: add digits before or after the real password to protect it. The manual indicates 18 digits.
- Anti-prying alarm: if someone tries to force the lock, an alarm will sound.
- Turn off the alarm: press [*] and enter the password, or press [#] and use a fingerprint.
- Password protection: 5 incorrect attempts within 5 minutes locks the system for 90 seconds.
Basic equipment care
The manual recommends using the lock within its technical ranges, avoiding prolonged sun exposure, cleaning the fingerprint reader with soft cotton, not striking the screen or reader, not hanging heavy objects from the handle, and keeping the mechanical keys safe.
Fingerprint
Place your finger correctly over the recognition area. The manual indicates covering at least 2/3 of the sensor area. During use, slightly varying the finger’s position helps the sensor read the texture better.
Low battery
If the lock announces low voltage, attend to it promptly. If it runs out of power, use a 5V Type-C power bank for temporary opening.
Frequently asked questions about the A5 Pro smart lock
How does the A5 Pro smart lock open?
The A5 Pro can be opened via facial recognition, fingerprint, password, IC card, the Tuya Smart app (if applicable), mechanical key, and temporary power via the 5V Type-C port.
What should I configure first?
The administrator must be configured first. After that, users, fingerprints, faces, passwords and cards can be registered as needed by the owner.
Does the A5 Pro work with Tuya Smart?
Yes, the lock can pair with Tuya Smart when the installation and the unit’s version allow it. Using a 2.4 GHz WiFi network during pairing is recommended.
Who prepared this manual?
This manual was prepared by Service Home Tech Panama to facilitate the handover, configuration and support of smart locks installed in apartments, residences and real-estate projects.
Need installation or programming for your A5 Pro lock?
At Service Home Tech we install, configure and pair your A5 Pro lock with Tuya Smart, register the administrator and users, and train you on daily use. Free quote on WhatsApp.
Manual prepared by Service Home Tech based on the Tenon A5 Pro manufacturer’s technical spec sheet and the operating manual supplied. If you need a printable PDF version, message us on WhatsApp.